MY LIVING ROOM – BEFORE & AFTER

my LIVING room- before & after Anterior Siguiente Everything started with the faux wood wall. I wanted this room to be a more accurate reflection of who I am as a decorator. Is where I spend most of my free time. Yes, it had already undergone some changes. When I first mooved in the walls were baby yellow, the floors were dark and worn out, and the balcony doors didn’t close properly. First came the white paint. That’s when the room started to feel fresher. Then came the new balcony doors. That change felt radical to me. I actually loved it so much that I took the curtains out. In January 2020 I installed the new floors. They are luxury vynil planks and I installed them myself. It seemed easy, you can cut them with an x-acto knife, and you glue them down. But as I was changing the floors for the entire house, it took me MONTHS. I don’t regret it at all, but if you are thinking of doing the same at home, please take a break every half hour, stretch, and then continue. Your back will thank you. At this point the space had changed a lot and I felt much more comfortable. But there was still something missing. I didn’t think it represented what I was capable of doing as a designer, so I started to make some extra changes. Anterior Siguiente This is what the living room looked like with the first round of changes. This is how the new changes started, with the faux wood wall, in January 2022. I wanted to do something special with that wall, but I had a hard time deciding what. I had started building a 3D model of the room and wasn’t sold on any idea, until this. The material is the same as the floors, just a little darker because it’s from a different batch. The install was really quick (three hours tops) and now I started to fell the room taking shape, leaning closer to my style. When I was happy with the 3D model I started making a list of all the tasks I had to do, and also the budget that I needed. Little by little, I started completing them: 👉Painted the door the same colour as the bathroom vanity 👉Reupholstered the sofa and the armchair 👉Made new chushion covers 👉Bought a rug that was the right size for the room (I had two sticked together before!) 👉Hung the TV and added two shelves for books 👉Painted and reupholstered the chairs 👉Painted over the geometric mural and created new art 👉Covered the hutch at the entrance with faux wood vynil and made a new top for it It took me months, but having an actual list of the tasks helped me a lot to realize how far along I was and what thing, even if it was something really small, I could do to continue. This is how it turned out. Anterior Siguiente If this transformation sparked your need to make some changes in your own home, I can help! Check out my online consultations. i want to know more

MY BATHROOM – BEFORE & AFTER

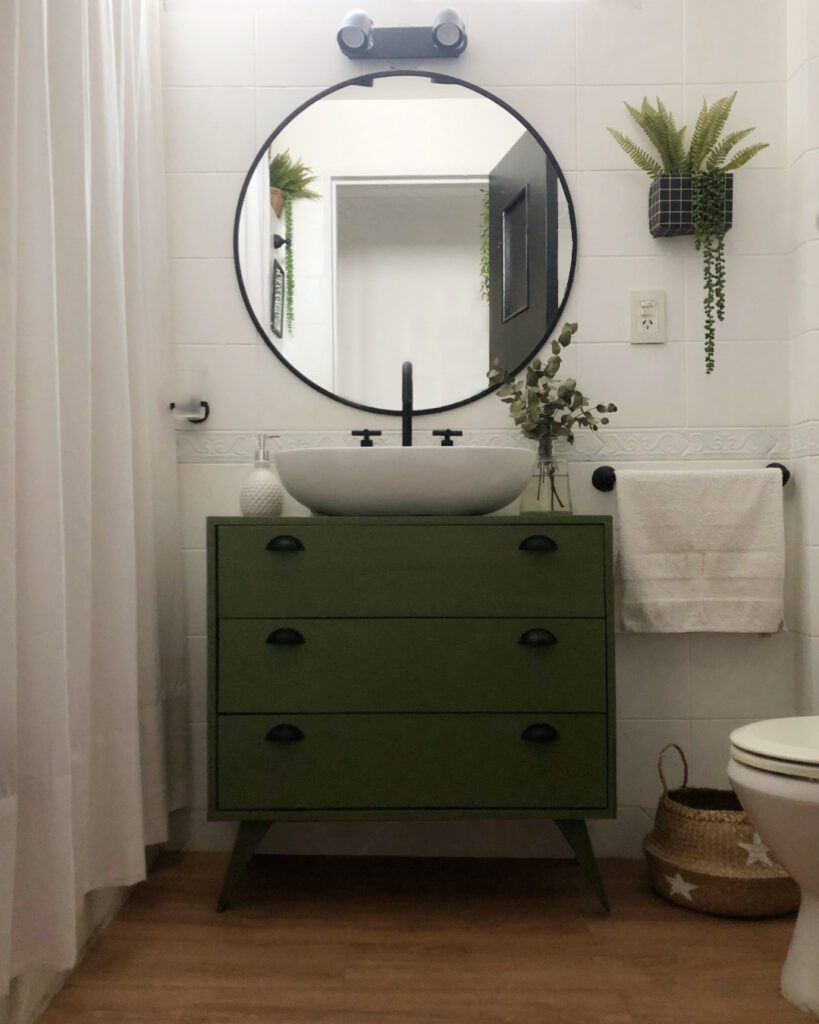
my bathroom – before & after The first thing I did was to paint the ceiling. PRO TIP: when you are renovating a room, it’s ideal to start from top to bottom. Then, I painted the tile. I used Sherwin Williams’ tile paint, but know there are more options available: Zinsser Bulls Eye 1-2-3 primer, and even chalk paint. The next step was to take out the medicine cabinet and the built in lights. It was a little difficult because the screws were really old and rusted, and some even broke, but with some patience we were able to take it out. I replaced it with a round mirror (bought online) and a new light fixture. That change alone gave me a lot of faith in the final outcome. Then, I had to take care of the vanity. I searched long a hard for one, but didn’t really like any of the options (or found them incredibly expensive). So I opted for buying an inexpensive pine dresser and a countertop basin. I drilled the holes I needed for the faucet and water line conections, and modified de drawers to accommodate the pipes. Also, I painted the dresser with synthetic enamel and installed new drawer pulls. And finally, I took care of the floors. At first, I used some tile stickers, but they weren’t floor specific and the deteriorated over time (learn from my mistakes! haha), so I made the decision to install the same vynil planks as the rest of the house. And that was it! The rest are decor touches. Previous Next If this transformation sparked your need to make some changes in your own home, I can help! Check out my online consultations. i want to know more

MY KITCHEN – BEFORE & AFTER

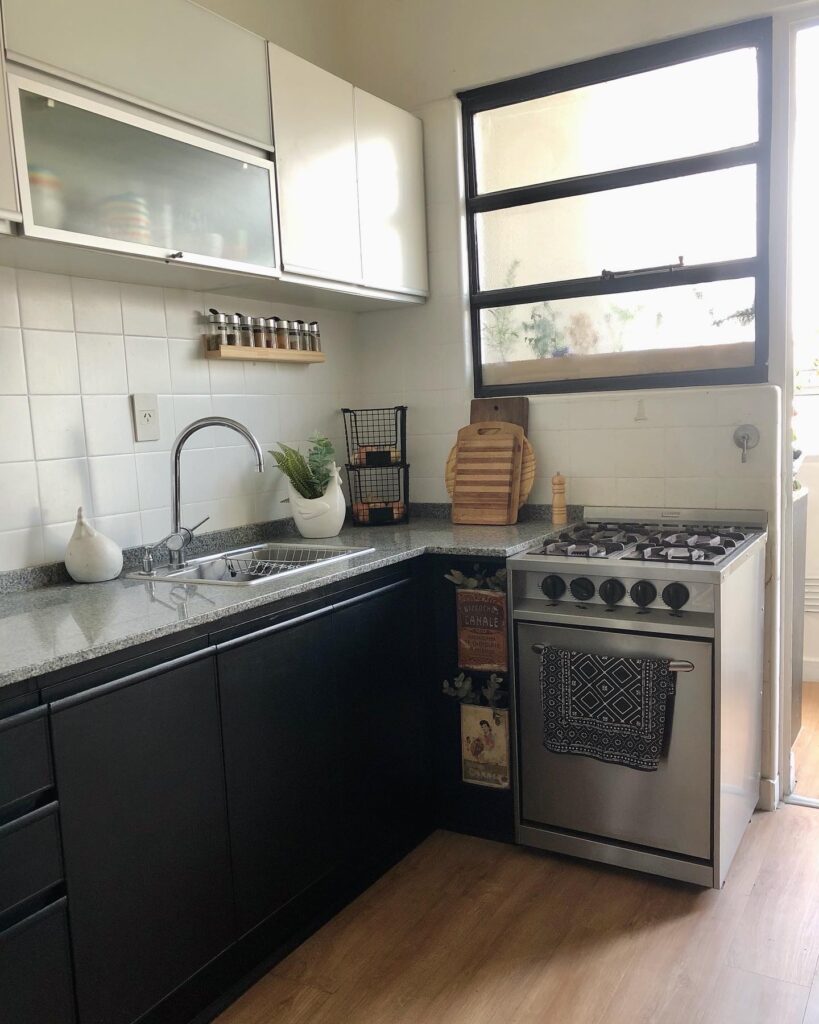
my kitchen – before & after The BEFORE The first thing I did when I moved into this house was to pain the kitchen tiles. I needed al least one of the colors to dissapear, because it was driving me crazy. About 3 months later, I changed the cabinets, because as you can see they were coming apart. I took the oportunity to expand the countertop, using the space that was meant for the fridge (mine didn’t fit). At that time, I painted the floors with a geometric design in white and gray, but I made a lot of mistakes and in a few months it started to deteriorate. When I bought the luxury vynil planks for the rest of the home, I thought the wood look would bring some much needed warmth to the space and I really love how it turned out. Later, I added the wood bar, so as to have a little bit more counter space. But something wasn’t clicking yet, and it was the tiled wall. So what did I do? I filled in the grout, sanded, suffered along with my dusty home, and then suffered some more while I cleaned the dust up. Once the sanding part was done, I primed the wall (don’t skip this step), and then painted it with a faux cement effect. That gave me the perfect background for a black and white gallery wall. What do you think of the final resault? ANTES Here you can compare the BEFORE and AFTER.  The complete AFTER. If this transformation sparked your need to make some changes in your own home, I can help! Check out my online consultations. i want to know more

COCINA – ANTES & DESPUÉS

Menu MIS SERVICIOS CURSO DECO SOBRE MĂŤ NEWSLETTER BLOG CONTACTO Mi cocina – Antes y despuĂ©s. EL ANTES Lo primero que te quiero contar es que en esta transformaciĂłn no me saliĂł todo bien. SĂ© que muchas veces vemos los antes y despuĂ©s y parece todo fácil, que se tomaron todas las decisiones correctas en el momento oportuno, y que con un poquito de esfuerzo saliĂł todo de 10. Acá no pasĂł eso, ni cerca. AsĂ­ que te voy a contar la versiĂłn sin censuras para que no te mandes las mismas macanas que me mandĂ© yo. Si puedo, quiero ahorrarte un par de problemas. Antes de mudarme, lo que hice fue pintar los azulejos. Necesitaba que se redujera alguno de los mil colores que habĂ­a en la cocina porque me estaba volviendo loca: rojo, amarillo, blanco, verde. Era un montĂłn. No lo pensĂ© demasiado, me parecĂ­a que era lo más sencillo, y que además aportaban tanto ruido visual que casi casi me mareaban. AhĂ­ la cosa habĂ­a mejorado mĂ­nimamente, pero seguĂ­a siendo un desastre. En la foto de arriba podĂ©s ver el antes con los azulejos ya pintados de blanco.  Unos tres meses despuĂ©s de que me mudĂ©, cambiĂ© los muebles: la realidad es que estaban destruĂ­dos, los cajones eran tan chicos que no entraba nada, y me daba CERO ganas de cocinar. AprovechĂ© y alarguĂ© la mesada usando el espacio que originalmente era para la heladera (donde la mĂ­a nunca entrĂł), y sumĂ© dos muebles en frente para tener un poco más de espacio de guardado. AhĂ­ sĂ­, ya se habĂ­a vuelto mucho más funcional y la cosa parecĂ­a ir bien.  ÂżCon quĂ© hice lĂ­o? Con el piso. Ya estaba todo mucho más lindo, y ese terrazzo rojo de patio sentĂ­a que me lo estaba arruinando. Ya un poco más envalentonada con mis dotes DIY, dije “listo, lo pinto”. El tema es que no la tenĂ­a muy clara con los materiales: usĂ© una pintura epoxi (que no te puedo explicar lo HORRIBLE que olĂ­a), y despuĂ©s de horas de armar el patrĂłn con cinta de papel, pintĂ© con aerosol los dibujos, porque pensĂ© que era lo que iba a quedar más prolijo. DespuĂ©s recubrĂ­ todo con laca al agua, y habĂ­a quedado sĂşper lindo, pero a los meses de uso se empezĂł a deteriorar: claramente habĂ­a hecho las cosas mal. Hice un mix de pinturas que no iba, y además no preparĂ© bien la superficie antes de arrancar. En un principio, lo dejĂ© ser. En ese momento todavĂ­a trabajaba en el banco y no tenĂ­a mucho tiempo libre para ocuparme. Cuando comprĂ© los pisos vinĂ­licos para el resto de la casa me pareciĂł que la madera iba a traer mucha más calidez al ambiente y la verdad es que amo como quedĂł.  Unos meses más tarde, sumĂ© la barra de madera sobre los dos mĂłdulos que habĂ­a agregado en la otra pared, para tener más espacio de mesada. Pero algo seguĂ­a sin convencerme, y era la pared con azulejos. Me molestaba el brillo más que nada. ÂżQuĂ© hice? RellenĂ© las juntas con recumix azul (es como un enduĂ­do que no se contrae, viene en polvo y se mezcla con agua), lijĂ©, sufrĂ­ por lo cubierta de polvo que estaba mi casa y despuĂ©s sufrĂ­ un poco más limpiando todo. Hacelo bajo su propio riesgo: lleva tiempo y muuuucho esfuerzo. Una vez que estaba lijado, apliquĂ© zinsser 123 como primer (si lo hacĂ©s, no te saltees este paso), y despuĂ©s pintĂ© la pared con un efecto sĂ­mil cemento. Esto me sirviĂł como base perfecta para la galerĂ­a de cuadros en blanco y negro que me imaginaba para este espacio. ÂżQuĂ© te parece como quedĂł? ANTES Acá podĂ©s comparar el antes y el despuĂ©s. El resultado final completo. Si este antes y despuĂ©s te dio ganas de hacer cambios en tu casa, te puedo ayudar con mis asesorĂ­as online. quiero saber más

BAĂ‘O – ANTES & DESPUÉS

Menu MIS SERVICIOS CURSO DECO SOBRE MĂŤ NEWSLETTER BLOG CONTACTO mi baño – antes & despuĂ©s Hay muchas posibilidades de que este proyecto sea lo que te trajo a mi cuenta. Allá en el 2020, cuando estabamos sumergidos en el principio de la pandemia, subĂ­ unas fotos asĂ­ nomás de cĂłmo habĂ­a quedado el baño. No sĂ© bien quĂ© pasĂł, quizás el no poder salir hizo que hubiera mucha gente en twitter, no estoy segura, pero se recontra viralizĂł y fue el primer empujĂłn que tuve para armar más seriamente el perfil de decowlasen en instagram.  Paso a contarte quĂ© cosas hice. lo primero fue pintar el techo y la pared hasta donde empiezan los azulejos. TIP: Cuando renovamos una habitaciĂłn, lo ideal es siempre empezar de arriba hacia abajo. DespuĂ©s, pintĂ© los azulejos. Yo usĂ© la pintura especial de Sherwin Williams, pero sabĂ© que hay más opciones: por ejemplo, el 123 de Zinsser y la pintura a la tiza. Lo que seguĂ­a era sacar el espejo con el botiquĂ­n y las luces empotradas. Fue un poco difĂ­cil porque los tornillos eran viejos y algunos se rompieron, pero con paciencia saliĂł. AhĂ­ lo reemplacĂ© con el espejo redondo (comprado en Mercado Libre) y las luces nuevas (de Easy). Ya con este paso el cambio se empezaba a ver y me entusiasmĂł mucho. SeguĂ­ con lo más complicado: el vanitory. BusquĂ© muchĂ­simo uno ya armado, pero ninguno me terminaba de convencer y me parecĂ­an carĂ­simos. OptĂ© por comprar una cĂłmoda de pino sĂşper econĂłmica y la bacha de apoyo. Al mueble le hice los agujeros correspondientes para que pasaran los caños del agua y además lo pintĂ© con esmalte sintĂ©tico. La colocaciĂłn y el cambio de griferĂ­a las hizo un plomer,o porque a eso sĂ­ que no me animo, ¡me daba pánico que nos quedemos sin agua! Lo Ăşltimo fue el piso. En un principio puse vinilos autoadhesivos, pero no eran especĂ­ficos para piso y con el tiempo se fue deteriorando (¡aprendan de mis errores! jaja), asĂ­ que tomĂ© la decisiĂłn de colocar el mismo piso vinĂ­lico sĂ­mil madera que estaba colocando en el resto de mi casa. Como es básicamente de goma, se recontra banca el agua y la humedad en general. Es de Makore Group. ¡Y listo! El resto son pequeños detalles de decoraciĂłn. Si este antes y despuĂ©s te dio ganas de hacer cambios en tu casa, te puedo ayudar con mis asesorĂ­as online. quiero saber más

LIVING – ANTES & DESPUÉS

Menu MIS SERVICIOS CURSO DECO SOBRE MĂŤ NEWSLETTER BLOG CONTACTO mi LIVING – antes & despuĂ©s Todo comenzĂł con la pared de madera. Hace tiempo tenĂ­a ganas de que el espacio donde paso más tiempo represente más mi estilo. SĂ­, el living ya habĂ­a sufrido una transformaciĂłn. Cuando me mudĂ©, las paredes eran amarillo patito, el piso era oscuro y estaba muy gastado, y las puertas al balcĂłn francĂ©s no cerraban del todo bien. Primero, llegĂł la pintura blanca. AhĂ­ ya empĂ©zĂł a tomar otra forma el ambiente, se sentĂ­a más fresco. DespuĂ©s, llegaron las nuevas puertas. Acá el cambio fue de la noche a la mañana. Me gustaron tanto que directamente saquĂ© las cortinas. Pensar en taparlas me parecĂ­a un sacrilegio. Y en enero del 2020 finalmente cambiĂ© los pisos. Son pisos vinĂ­licos que se adhieren con pegamento doble contacto. ParecĂ­a fácil: se cortan con cutter, se pegan. El Ăşnico tema es que mi plan era cambiar el piso en casi toda la casa, por lo que me llevĂł MESES. No me arrepiento en absoluto, pero si estás pensando en hacerlo en casa: pará cada media hora, estirá y despuĂ©s seguĂ­. Tu cintura te lo va a agradecer.  A esta altura, el espacio habĂ­a cambiado mucho y me sentĂ­a mucho más a gusto que cuando reciĂ©n me mude, pero todavĂ­a le faltaba algo. No sentĂ­a que representara lo que yo sabĂ­a hacer. AsĂ­ que me propuse hacer algunos cambios más.  AsĂ­ habĂ­a quedado el living con los primeros cambios.  Y asĂ­ empezĂł el nuevo cambio, con la pared sĂ­mil madera en enero del 2022. Hace tiempo querĂ­a hacer algo especial en esa pared del comedor, pero no terminaba de decidir quĂ©. HabĂ­a arrancado un modelo 3D del living, y nada de lo que probaba me terminaba de convencer, hasta que llegĂł esta idea  El material es el mismo que el del piso, solo que como es una partida más nueva es un poquito más oscuro. La colocaciĂłn fue rápida (unas tres horas como mucho) y ahora sĂ­ sentĂ­a que el ambiente estaba tomando forma, acercándose más a lo que yo querĂ­a.  Cuando estuve conforme con los cambios en el modelo 3D pasĂ© a hacer una lista de todas las tareas que tenĂ­a que hacer, y tambiĂ©n a desglosar los costos. De a poco, empecĂ© a sumar cambios: PintĂ© la puerta de entrada del mismo color que el vanitory del baño. RetapicĂ© el sofá y el sillĂłn de un cuerpo. Hice almohadones nuevos. ComprĂ© una alfombra del tamaño correcto para el living (la anterior eran dos pegadas que comprĂ© de oferta en Falabella) ColguĂ© la tele y sumĂ© dos estantes de madera para poder colocar los libros, para sacarlos del comedor donde no entraban sĂşper bien. PintĂ© y retapicĂ© las sillas. TapĂ© el mural de la entrada y pintĂ© un cuadro nuevo. RecubrĂ­ el mueble de la entrada (el combinado para los amigos) con vinĂ­lico sĂ­mil madera y le hice una tapa nueva. Me llevĂł meses, pero teniendo el listado detallado de todas las tareas me ayudĂł un montĂłn a ver cuánto estaba avanzando y quĂ© tarea, aunque fuera pequeña, podĂ­a hacer. Y asĂ­ quedĂł:     Si este antes y despuĂ©s te dio ganas de hacer cambios en tu casa, te puedo ayudar con mis asesorĂ­as online. quiero saber más